28/01/2012

Double-Chocolate Marbled Loaf Cake


 On Thursday I only had to go to school in the morning for my Dutch oral, so I decided to use my free afternoon to bake something! In December I got 'The Great British Bake Off - How To Bake', an amazing book with lots of recipes for cakes and othe bakes. You might know The Great British Bake Off, it's a baking competition, and the second series was on BBC at the end of last summer. I watched the entire series and really enjoyed it, so I really wanted the book! The book contains recipes by the contestants, explanations of the technical challenges (such as Paul Hollywood's foccacia) and other recipes. I decided to bake the Double-Chocolate Marbled Loaf Cake, because I love chocolate and it did not seem all to difficult to make. This recipe makes 1 large loaf cake, you will need a 900 gram loaf tin which measures approximately 26 x 12.5 x 7.5 cm. Grease the loaf tin and then line it with a strip of greaseproof paper, this will make it easier to remove the cake from the tin.

Ingredients

For the sponge:
250 g unsalted butter, softened
250 g caster sugar
4 large free-range eggs, at room temperature
1 teaspoon vanilla extract
250 g self-raising flour
Good pinch of salt
75 g dark chocolate (70% cocoa solids), roughly chopped
75 g good-quality white chocolate, roughly chopped
1 tablespoon cocoa powder

To finish:
25 g dark chocolate (70% coca solids), roughly chopped
25 g good-quality white chocolate, roughly chopped
30 g unsalted butter, diced

Preheat the oven to 170 degrees Celcius/325 degrees Farenheit/gas 3. Put the soft butter in a bowl and beat with a wooden spoon or electric mixer for 1 minute or until creamy. Gradually beat in the sugar and beat thoroughly until the mixture turns pale and fluffy.

Beat the eggs with the vanilla just until combined, then gradually add to the creamed mixture, beating well after each addition; add 1 tablespoon of the flour with each of the last 2 portions of egg to prevent the mixture from curdling. Sift the rest of the flour with the salt into the bowl and gently fold in with a large metal spoon. Transfer half the mixture to another bowl.

Put the dark chocolate into a heatproof bowl and set over a pan of steaming hot (not boiling) water (don't let the base of the bowl touch the hot water). Melt gently, stirring frequently. Remove the bowl from the pan and leave to cool while you melt the white chocolate in the same way.

Sift the cocoa powder into one bowl of cake mixture. Add the cooled melted dark chocolate and mix gently until thoroughly combined. Carefully stir the cooled melted white chocolate into the other bowl of cake mixture. Spoon both mixtures into the prepared loaf tin, adding tablespoonfuls of each mixture alternately. Gently bang the tin on the worktop to eliminate any pockets of air, and carefully smooth the surface. Draw a chopstick or table knife through the two mixtures, swirling, to marble them.

Bake for about 1 1/4 hours or until a skewer inserted into the centre of the cake comes out clean. Set the tin on a wire rack and leave to cool for 20 minutes, then carefully turn out the cake onto the rack and leave to cool.

To finish, put the dark chocolate into one heatproof bowl and the white chocolate into another. Add half of the butter to each bowl, then melt gently as above. Using a teaspoon (or a small piping bag), drizzle the 2 chocolate mixtures over the top of the cooled cake. Leave to set, then wrap the cake in greaseproof paper or foil and leave for a day before slicing. Store in an airtight container and eat within 5 days.

My notes:
- For my oven, a fan-assisted oven, 170 degrees Celcius was slightly too hot which caused the edges to be a bit burnt. It was done within 1 hour. If I make this cake again I will put the oven at 160 degrees Celcius. I think this is something you need to try out a bit, because every oven is slightly different.
- When I was making the chocolate to drizzle over the top, something went wrong with the white chocolate. I don't know why this is, it might have been the temperature or the combination with the butter because when I melted white chocolate without butter for the sponge it worked fine. I couldn't use the chocolate anymore (that's why there is no white chocolate over my cake). I would recommend melting the white chocolate without butter, also because white chocolate already has quite a lot of fat itself.

This is what my cake looks like from the inside, cool right? I really like the look of marbled cakes!


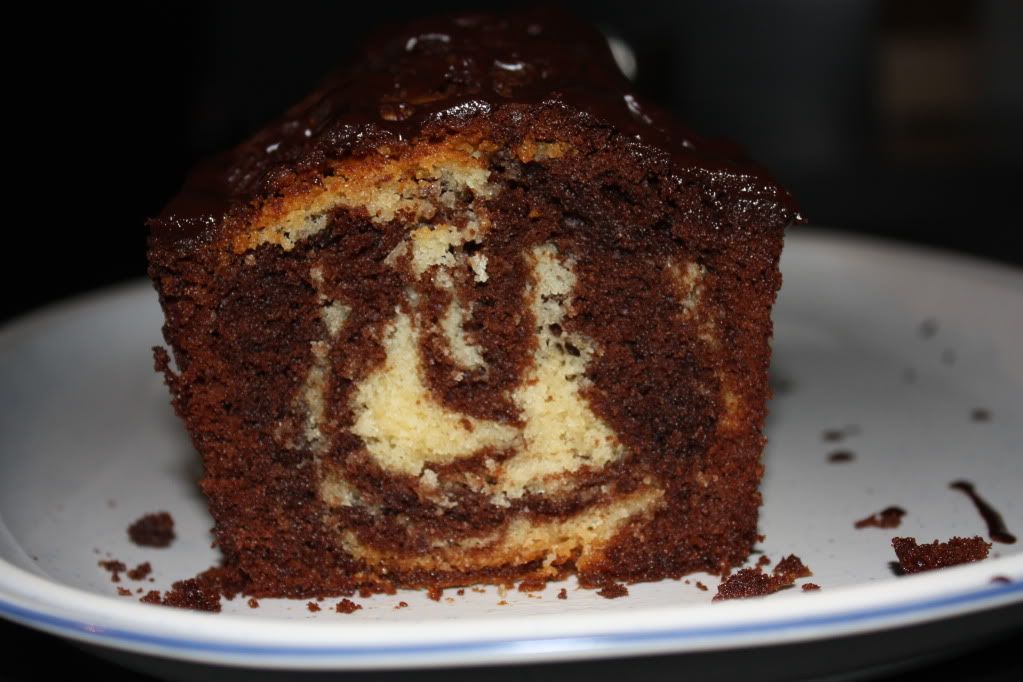
Oh and the cake also tastes great, the taste of the dark chocolate comes through really nicely in the sponge, it's not too strong. The chocolate on top is a bit strong, although that would have been toned down if I had also had white chocolate to put on top. Even my brother, who is always quite picky, likes it so that's a good sign! I think this is a cake I will make again in the future.

Source of the recipe: Collister, Linda. The Great British Bake Off How To Bake The Perfect Victoria Sponge and Other Baking Secrets. Random House, 2011. Print.

Have you ever watched The Great British Bake Off?

20/01/2012

Review: The Body Shop Spiced Vanilla Bubble Bath and Body Butter

Last week I went shopping for some present for my best friend, Eline, and as I still had a 5 euro voucher for The Body Shop, I decided to also buy a little 'present' for myself. After smelling different projects and thinking which I like best I decided to go for the Spiced Vanilla Bubble Bath and the Spiced Vanilla Body Butter. The Spiced Vanilla range was a limited winter range, and the products were on sale. At the moment most shops are selling the last few products from this range, but I still would like to review these products because I was dissappointed by one and surprised by the other.

 First of all, the Spiced Vanilla Bubble Bath. I actually wanted to buy the shower gel, but they did not have it anymore, so I decided to go for the Bubble Bath. I also needed a new bath product, and I love foamy baths, so I though this would be a great product for me. The product promises a bath full of bubbles, so I tried it out right away. But what a disappointment. When I added some of the product, which has the consistency of a shower gel, to the bath while the tap was on, I already saw very little happening. I thought I was adding too little, so I added some more. The Bubble Bath created a very thin foamy/bubbly layer on the water, but nothing more. This foamy layer also dissolved very quickly, so that I was left with just water with the fragrance of Spiced Vanilla. Speaking about the fragrance, I have no complaints about that! I think it is really nice so I decided to use the product as a shower gel, and using my puff sponge it becomes quite foamy.

Then the Body Butter from the same range. I was pleasantly surprised by this product. I really need to start using body butter more often, but I am usually too lazy to spend time 'buttering' my whole body in the morning. However, this one smells great and I just have to use it! It works just like any other body butter, but the smell is what makes it special. Spiced Vanilla greatly describes the fragrance of both the Body Butter and the Bubble Bath. Personally I do not have dry skin, but I think this would be a great product for people with dry skin because it is really like butter and it melts in to your skin quite well.

Because of the disappointment with the Spiced Vanilla Bubble Bath I probably will not buy a product like this at The Body Shop again. However, I do really like the body butter and I would really like to recommend it to you. You may still be able to find it in a The Body Shop, but it is not sold online anymore, unfortunately.

What do you think of these products and The Body Shop in general?

Loes

07/01/2012

Review: Dr. Organic


I first discovered Dr. Organic about a year ago, when a friend gave me a shower gel and a lip balm from the Pomegranate range. It took me a while to get used to the smell of pomegranate, because I had never used any products with pomegranate before, but after a while I really loved it! Dr. Organic always tries to use the finest natural and organic materials to create their products. Furthermore, their products do not contain harsh chemicals such as sodium lauryl sulphate (SLS, something a lot of people try to avoid because it can dry out your skin), parabens and artificial fragrances. And it gets better: no animal ingredients, no animal testing, no GM ingredients and no mineral oils. Dr. Organic has many different products within the following ranges: Aloe Vera, Pomegranate, Tea Tree, Vitamin E, Lavender, Manuka Honey, Virgin Olive Oil, Royal Jelly and Rose Otto. Within these ranges there are lots of products, such as body wash, shampoo, skin lotion, body butter, deodorant, lip balm, eye cream, day cream, and even toothpaste. So, there is something for everyone.

I haven’t tried very many Dr. Organic products yet, but I will review the ones I have tried. The first one is the Pomegranate body wash.


The bottle looks nice, quite simple but attractive. The body wash is a pinkish colour, although the colour can vary per batch and this does not affect the product. At first I thought this body wash smelled of washing-up liquid but after a while I got used to it and now I really like the fresh and fruity smell. This fresh fruityness is probably also why I thought it smelled like washing-up liquid. I usually put the body wash on my puff sponge, to foam it up a bit. Even though the product does not contain SLS, which is often used to create foam, it still foams. This is something I really like, because I always want my shower products to foam, it just makes it feel nicer and it also makes it more fun! I don’t have the feeling this body wash does anything for my skin, or at least not more than other shower gels/body washes I have used. However, my skin is quite normal and not dry so maybe it works differently on someone with a different type of skin. All in all I like this product, and a new bottle of it is waiting for me in the cupboard.

Another product from the Pomegranate range that I own is the lip balm.
The packaging of the lip balm looks like any other lip balm, just the lid is smaller than most lip balms I have had, and you have to turn at the top instead of the bottom to get the lip balm out. I really like the smell of this lip balm, but I think the texture is a bit hard. However, once I have rolled it over my lips a few times it softens and is easier to apply. The lip balm contains shea butter and vitamin E and it has SPF 15 protection.  Again, I can’t really say whether this product makes my lips softer because I don’t have dry lips very often. Also, I don’t use a lot of lip balm so I don’t have anything to compare it with. However, I think it’s worth a try for anyone with dry lips because of the smell and the natural ingredients it contains.

At the moment I am using the Manuka Honey body wash, so I will also review that product.

The bottle is very similar to the Pomegranate one, just the colouring and the picture is different. I like this, because it keeps the Dr. Organic products very recognisable. This body wash really smells of honey, and I think it might not be a smell everyone likes. I think it is a bit strong, but also quite nice. This strong smell doesn’t stay after you’ve showered, which I like, but you could always emphasise it by also using a body butter from this range. On the whole, this body wash is quite similar to the Pomegranate one. There is no difference in the effect of the body wash on my skin, but I think someone with very dry skin might be better off using the Manuka Honey body wash because of the moisturising properties of honey.

As you can see, I quite like Dr. Organic products. I’m sure I’ll buy them more often, but not too often because I like to vary with shower products and try different brands and smells.

In The Netherlands, Dr. Organic products are available at De Tuinen, and the body wash costs 7,19 for 250 ml and the lip balm costs 4,19. In the UK you can buy Dr. Organic products at Holland & Barrett.

Have you tried Dr. Organic products before? What do you think of them?

Pictures come from the website: www.drorganic.co.uk

01/01/2012

Hello 2012!

Hi :)

I haven't blogged in ages. I am so busy with school, because I am in my final year. But I decided that I should try to post something once a week from now on. I would like to work in the media in the future so it might be useful to practice by writing some articles/posts! I will write about different topics, ranging from beauty to cooking to travelling, and eventually try to find my favourite thing to write about. But I will start off in this post by looking back at 2011 and welcoming 2012, a year that will bring many changes.

2011 went by really fast, it feels like it was January 2011 just a month ago. I did a lot of amazing things throughout this year. I will take you through my year in chronological order, stopping at the most amazing events that took place in my life. Some months have been skipped because nothing really interesting happened in those months.

Mosque in Marrakech

March - At the beginning of this month I went on a school trip to Morocco. We spent a few days in Marrakech, followed by a few days in the Atlas mountains. Both parts of the trip were amazing, and I certainly want to visit Morocco again. I also celebrated my 17th birthday in Marrakech!

July - In July I went to England for 10 days with my parents and brother. I wasn't there just for a holiday, I was visiting universities! I visited Royal Holloway University of London, University of Reading, Oxford, Cambridge, King's College London and Queen Mary University of London. It was a busy but fun trip because I visited some cities I had never been to before.

August - At the end of August I started my last year of high school. It's a busy year, and it feels like I have too little time to do too many things. That's the reason I didn't blog much since August.

October - In October I sent in my university application to UCAS and also got my first offer from Royal Holloway for Spanish with German. I also handed in my Extended Essay in this month.

 Oriel College, Oxford

December - I went to Oxford for 3 days for interviews at Oriel College! It was a great experience to go through this process and the interviews were quite enjoyable. Eventually I got rejected though, which means I will be going to London.

As you can see it's been a busy year. 2012 won't be any different for me, especially with my exams coming up in May. Here a few big things that will happen in 2012:

March - On the 6th of March I will be turning 18! Unfortunately this is right in the middle of my mock exams and therefore I will have to celebrate the weekend after.

May - In May I will have my IB exams! I start on the 2nd of May with English paper 1 and finish on the 18th of May with Biology paper 3. I'm already looking forward to the last day, when it will finally all be over!

September - At the end of summer I will be moving to London to go to university! I still need to pick which university I will go to (either King's College or Queen Mary) but I am already really excited. This also means I will be moving out and I won't live with my parents anymore.

A very exciting year as you can see, with a few big things to look forward to! I will keep you updated on all important things that happen this year :)

One question to you, my reader: what type of post would you like to see on my blog soon?

Loes